Western Blot Protocol

A Simple Western Blot Protocol from ARP
At its core, a western blot (or ‘immunoblot’) is simply a way of detecting if a specific protein is present among a complex mixture of other proteins, such as from a cell lysate. There are three basic elements to a western blot:- Separating proteins in a sample based on their size, using gel electrophoresis
- Transferring the proteins from the gel to a more solid support membrane
- Detecting the target protein with antibodies and visualizing.
- Sample preparation (cell lysate or tissue homogenate),
- type of gel (agarose, polyacrylamide, or starch),
- Transfer membrane (PVDF or nitrocellulose),
- Transfer currents and times,
- blocking and washing buffers,
- incubation conditions.
Western Blot Solutions and Reagents:
Sample buffer
Laemmli Sample BufferRunning buffer
Running buffer is typically prepared as a 10X concentrate and diluted before use, containing 25 mM Tris, 192 mM glycine, 0.1% SDS, pH 8.3. Running buffers from ARP can be found here.Molecular weight markers
Transfer membrane
PVDF, in the example belowBlocking buffer
Such as 5% non-fat dried milk or BSA, dissolved in PBS: ARP sells as number of blocking buffers for western blotting.Washing buffer
Usually the same as blocking with 0.1% Tween-20 added. Washing buffers for western blotting from ARP can be found here.Western Blot Protocol Steps
Step 1: Loading and running the gel
- Decide the gel percentages that you need based on the size of your protein of interest:
| Protein size | Gel percentage |
| 4–40 kDa | 20% |
| 12–45 kDa | 15% |
| 10–70 kDa | 12.5% |
| 15–100 kDa | 10% |
| 25–100 kDa | 8% |
Step 2: Protein Separation
This is the step which separates out your protein from the morass of others you are not interested in.- Place the gel in the electrophoresis tank
- Ensure wells are located in an accessible position, usually the top.
- Make sure to remove any combs or plastic strips from the gel
- Fill the tank with running buffer to the fill line
- Dilute samples in sample buffer and boil in a heat block for 5 min at 60-100°C
- Briefly centrifuge to collect the sample at the bottom of the tubes.
- The exact temperature will depend on the stability of your protein.
- Load one sample per well of the gel
- Generally for a 30 µl well 20-25 µl of a sample is loaded per well
- Don’t forget to include any controls and the molecular weight markers/protein ladder
- Connect and set the power source to a constant voltage, and leave it on until just after the dye from the molecular weight markers falls off the gel (usually about 1.5 hours)
- Check for bubbles forming at the bottom of the box to make sure a current is being made.
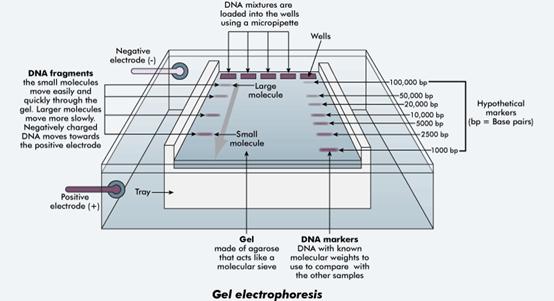
A typical gel electrophoresis apparatus.
Image credit: Western Australia Department of Training and Workforce Development
Step 3: Transferring proteins from the gel to a membrane
Now you have your separate proteins, you need to transfer them to a membrane, ready for imaging.- Cut the membrane to the size of your gel and rinse with deionized water
- Do this step while your gel is running
- Tip: cut one corner of (or otherwise mark) the membrane so you know which is the top
- Soak the membrane in methanol of one minute
- Rinse then cover the membrane in transfer buffer
- Soak two pieces of filter paper in transfer buffer
- When the gel has run, carefully remove it from the tank, being careful to note the location of lane 1, and place it on to one of the sheets of filter paper.
- Tip: Cut a small portion of the corner off next to lane 1
- Moisten with transfer buffer and carefully remove any air bubbles
- Matching the trimmed corners, place the membrane on the gel.
- Again being careful to avoid or remove air bubbles.
- Be careful not to move the membrane one it’s on the gel, as this could result in ‘ghost bands’
- Complete the ‘sandwich’ by placing the other pre-wetted filter paper on top of the membrane
- Place the completed sandwich in to the transfer tank (adding fibre sponges to either side if needed for your equipment)
- Close the lid and connect up to power source at 20-25V for about 30 minutes
- This can be done overnight at a lower voltage.
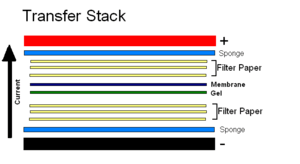
Example Western Blot Transfer Stack
Step 4: Detecting your protein
- Carefully disassemble the transfer sandwich
- Check that the bands from the molecular weight markers are on the membrane, and not still the gel
- Wash the membrane in washing buffer with gentle agitation (e.g. on a plate shaker) for about 3 minutes
- Transfer to a container with blocking buffer, ensuring that the membrane is fully covered, cover and incubate overnight at +4°C with gentle agitation again.
- The next day, remove from +4°C and allow to reach room temperature.
- Wash three times as in step 2 for about 5 minutes, using fresh wash buffer each time.
- Dilute your primary anti-protein antibody in buffer, usually wash buffer
- Remove the membrane from the wash buffer and incubate with the primary antibody at room temperature for about an hour.
- Wash as in step 5
- If using a directly conjugated primary antibody go straight to Step 13.
- If using a secondary antibody dilute this now in buffer
- Remove the membrane from the wash buffer and incubate with the secondary antibody at room temperature for about an hour.
- Wash as in step 5.
- Follow the instruction for developing your detection substrate and image the blot ready for analysis.
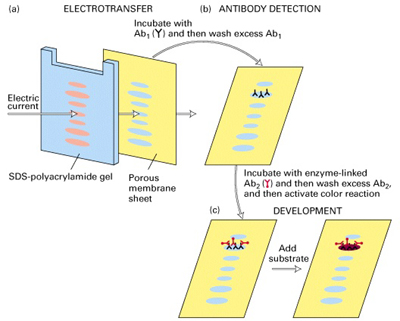
Diagram to show all the steps from our Western Blot Protocol
Image Courtesy of UCSF School of Medicine
Membranes can usually be preserved by sandwiching between dry filer papers and wrapping with tinfoil. Store dry at +4°C. It is also possible to strip the antibodies off of a membrane and re-blot, targeting the same or another protein, if desired.Download a free pdf version of this western blot protocol here.
Download PDF : Filed Under : Antibodies, Western Blot